Saturday, 31 January 2015

Create a Partition From Command Prompt

Create a Partition From Command Prompt

First of all you have to type diskpart to access the program called Diskpart.
Command Prompt
After you've launched diskpart it's time to establish which hard-disk will be used to create a new partition. You need to select the hard disk using the select command. To view available disks and select the desired one you will use the commands list and select, as you can see below. First type list disk. This lists the available hard disks. To select the disk you desire, type select disk followed by the number of the hard disk you want to use.
Command Prompt
To create a new partition you need to use the create partition command followed by partition type and size.
The list command used previously also displays the available free space on each hard disk. Your partition must be of a size equal or less to the amount of available free space.
In order to make a new primary partition with the size of 5000 MB, let's say, we will type create partition primary size=5000. Use the same command and change the size according to your needs and the available free space on your hard disk.
Note: More info about partition types can be found in the article What Is A Partition?.
Command Prompt
Now you have the possibility to assign a letter to the newly created drive by using the assign command. We will assign the R letter by typing assign letter = R.
Command Prompt
Finally you have to format the newly created partition, in order to use it. Type the command format fs=ntfs quick. Use help format to find out more information about this command.
Command Prompt
When you are done working with diskpart, type the exit command to close the program.
Command Prompt

Delete a Partition From Command Prompt

When you need to delete a drive from your computer, the procedure is quite simple. First, open the diskpart application. Then, select the partition you want to delete and type the delete partition command. A sample of how the delete operation works in Command Prompt is provided below. It is a matter of selecting the disk where the partition is found, then selecting the volume to be deleted and running the deletion command.
Command Prompt

Check the State of a Disk

To check a disk for errors you have to use the chkdsk command. Just type chkdsk followed by the drive letter. I recommend that you always use this command in combination with the /f parameter. This enables the tool to automatically fix any errors it finds.
As an example, we will scan the h: drive for errors by typing chkdsk /f h: and pressing Enter. The scan process will start.
Command Prompt
After the scan is finished you will see a report similar to the one from the picture below.
Command Prompt

Thursday, 29 January 2015

How to use whatsapp Desktop

WhatsApp on Desktop

step 1: 1st Enter the website on your desktop browser https://web.whatsapp.com/ 
next
Go on your whatsapp application in your android phone or 


Monday, 19 January 2015

How  to identified old sim card phone number
Idea சேவையைப் பயன்படுத்துபவர்கள் *1#
Bsnl சேவையைப் பயன்படுத்துபவர்கள் *888#
Aircel சேவையைப் பயன்படுத்துபவர்கள் *131#
Videocon சேவையைப் பயன்படுத்துபவர்கள் *1#
Airtel சேவையைப் பயன்படுத்துபவர்கள் *121*9#
Reliance சேவையைப் பயன்படுத்துபவர்கள் *1#
Virgin Mobile சேவையைப் பயன்படுத்துபவர்கள் *1#
Vodafone சேவையைப் பயன்படுத்துபவர்கள் *131*0#
Tata Dcomo சேவையைப் பயன்படுத்துபவர்கள் *580#

How to Android phone password and pattern reset

உங்கள் ANDROID போனின் PASSWORD, PIN ஆகியவற்றை மறந்து விட்டிர்களா ?

News
உங்கள் Android போனின் Pattern, Password, pin ஆகியவற்றை மறந்து விட்டிர்களா ?

Service Center அல்லது வேறு கடைகாரரிடம் எடுத்துச் சென்றால் 300லிருந்து 350 வரை கேட்பார்கள்.  ஆனால், அதை நீங்களே சுலபமாக  Unlock
செய்து கொள்வதற்கான வழிகள் கீழே கொடுக்கப்பட்டுள்ளது.

Android போனின் pattern,password,pinஐ எடுக்க இரண்டு வழிகள் உள்ளன
                        1. Google Account
                        2. Wipe data (format,factory reset)
Google Account
பலர் இதற்கு internet connection தேவை என்று நினைக்கின்றனர். ஆனால், இதற்கு internet connection தேவை இல்லை.
முதலில் உங்கள் pattern password, pinஐ மூன்று முறை தவறாக போடுங்கள்.

கீழே "Forgot Pattern?" என்று வரும். அதை Select செய்யுங்கள். பின் உங்கள் Gmail Address ,Password ஆகியவற்றை type செய்து Sign in கொடுங்கள்.

இப்போது உங்கள் புது pattern password, pinஐ Set செய்து கொள்ளுங்கள்.
WIPE DATA :
உங்கள் போனை switch off செய்யுங்கள்
off ஆனவுடன் power button +home button + volume up button ஆகியவற்றை சேர்த்து அழுத்துங்கள். இது எல்லா போன்களில் வேலை செய்யாது, Googleலில் how to go to recovery mode in "உங்கள் போன் மாடல்" என்று search செய்யுங்கள்.
recovery modeல் touch screen வேலை செய்யாது. volume button move செய்வதற்கு, home button அல்லது power button select செய்வதற்கு recovery modeல் "wipe data" optionஐ select செய்யுங்கள், பின் yes select செய்யுங்கள்.
இப்போது "reboot system now" optionஐ select செய்யுங்கள். அவ்வளவுதான், சுலமாக unlock செய்து கொள்ளலாம்.

Tuesday, 30 December 2014

Windows 7 Administrator password reset method

step1: Insert Windows 7 os cd restart your pc

step2 :Select first boot DVD driver

step3 :Press any key from boot CD/DVD Enter

step4 :Go to Repair option,and then Dos command mode enter

step5 :Please type below mentioned code:

copy D:\windows\system32\sethc.exe D:\
copy D:\windows\system32\cmd.exe D:\windows\system32\sethc.exe
Reboot system after logon screen display
press
5 times Shift Key…
net user Username MyNewPassword

Pendrive Shortcut virus

1) முதலில் பென்டிரைவை உங்கள் கணினியில் சொருகி கொள்ளுங்கள்.

2) Start ==> Run ==> CMD==> Enter கொடுக்கவும்.


3) இப்பொழுது பென்ட்ரைவ் எந்த ட்ரைவில் உள்ளது என பாருங்கள். My Computer 

செல்வதன் மூலம் கண்டறியலாம்.


4) உதாரணமாக E: டிரைவில் பென்ட்ரைவ் இருக்கிறது எனவைத்து கொள்வோம் அதற்கு 

நீங்கள் E: என கொடுத்து Enter அழுத்தவும்.


5) attrib -h -s -r /s /d *.*என டைப் செய்யுங்கள் ஒவ்வொருபகுதிக்கும் Space சரியாககொடுக்கவும்.


◦நீங்கள் சரியாக கொடுத்துஉள்ளீர்கள் என உறுதி செய்து கொண்டு Enter அழுத்துங்கள்.


◦சில வினாடிகள் பொறுத்திருங்கள். இப்பொழுது உங்கள் பென்ட்ரைவ் சோதித்து பாருங்கள் உங்களுடைய பைல்கள் அனைத்தும் திரும்பவும் வந்திருக்கும் —

Monday, 22 December 2014

How To Configure DHCP Failover In Windows Server 2012 R2

How To Configure DHCP Failover In Windows Server 2012 R2
In this example we will be using 2 servers, each on which DHCP server role will be installed, on our first server which is a domain controller the DHCP server role has been installed and configured. This is our primary DHCP server (AD.PRAJWAL.LOCAL) running Windows Server 2012 R2 Datacenter edition. On another server running Windows Server 2012 R2 Datacenter edition (DHCP2.PRAJWAL.LOCAL), we will be installing the DHCP server role. Launch the ServerManager and select DHCP Server role. Click Next.
Description: How To Configure DHCP Failover In Windows Server 2012 R2
Click on Install.
Description: How To Configure DHCP Failover In Windows Server 2012 R2
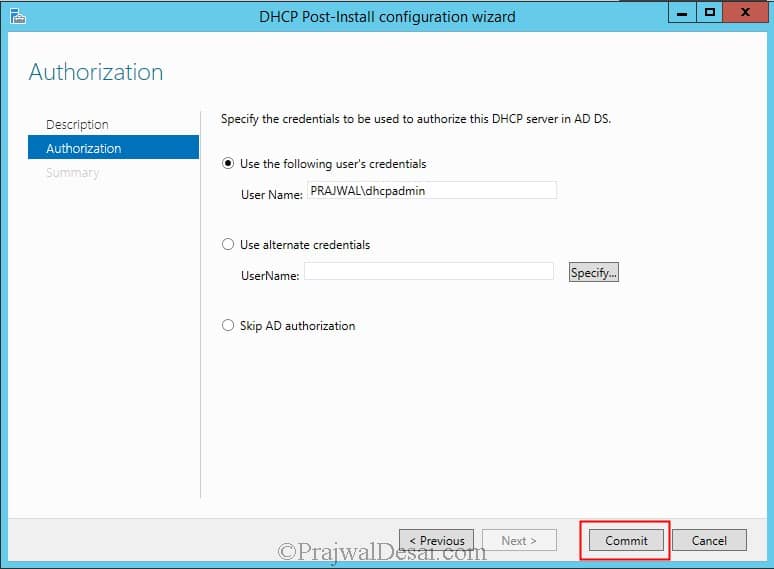
Do not click Close, click on Complete DHCP configuration.
Description: How To Configure DHCP Failover In Windows Server 2012 R2
Click Commit.
Description: How To Configure DHCP Failover In Windows Server 2012 R2
Now on the first DHCP server, launch the DHCP console, right click on IPv4 and click onConfigure Failover.
Description: How To Configure DHCP Failover In Windows Server 2012 R2
Click Next.
Description: How To Configure DHCP Failover In Windows Server 2012 R2
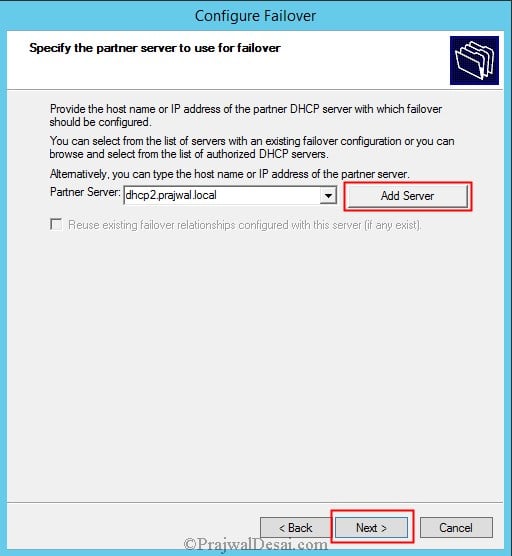
Click on Add Server to add the partner server used for failover. Add the second DHCP server and click Next.
Description: How To Configure DHCP Failover In Windows Server 2012 R2
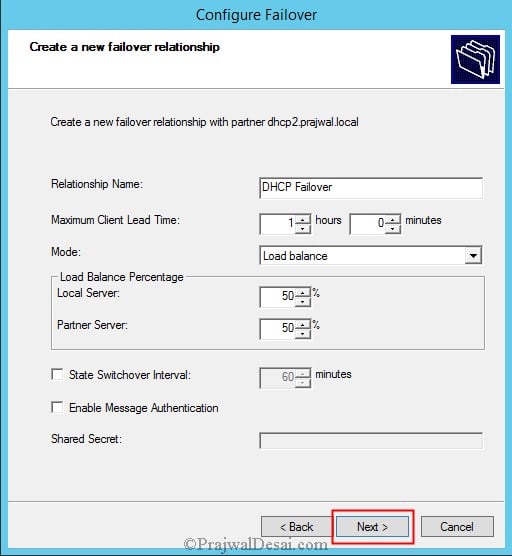
Type the Relationship Name, select the Mode as Load Balance. Click Next.
If you are looking for explanation of each setting, here it is
Note
Relationship Name - A name to identify the failover.
Maximum Client Lead Time – Determines maximum amount of time that one server can extend a DHCP lease for a client beyond the time known by the failover server.
Mode – Load Balance settings for an active/active configuration or Hot Standby for an active/passive configuration.
State Switchover Interval – If this setting is enabled the active DHCP server will automatically place its partner into down state when it can’t communicate with it for the specified amount of time.
Enable Message Authentication – This option enables authentication of the failover replication traffic between partners. If you enable this option you must also specify the Shared Secret.
Description: How To Configure DHCP Failover In Windows Server 2012 R2
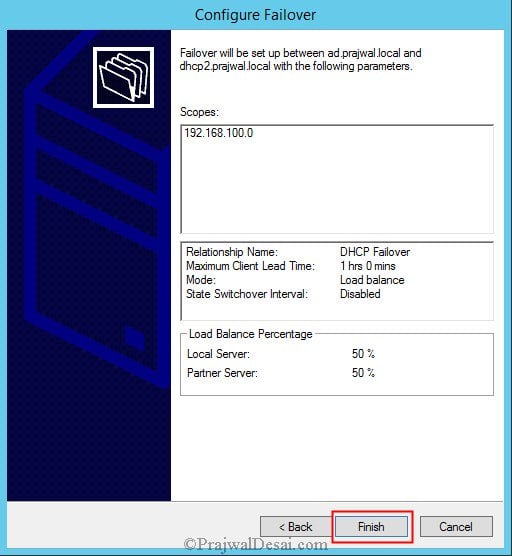
Click Finish.
Description: How To Configure DHCP Failover In Windows Server 2012 R2
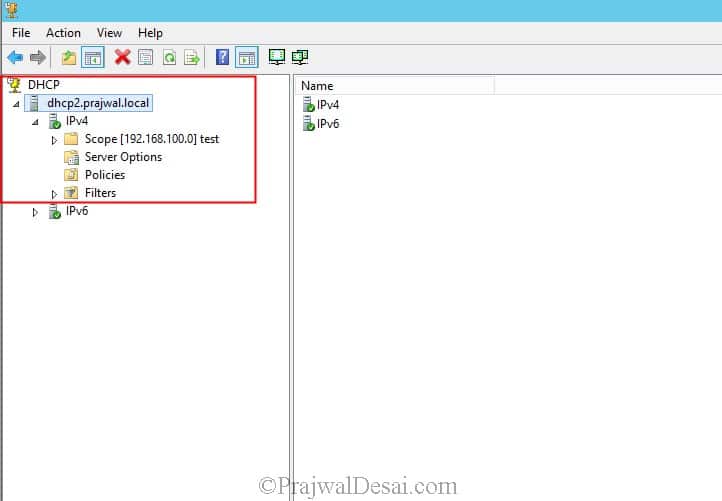
Launch the DHCP console on the second DHCP server and you should see the IPv4 Scope similar to the one seen on primary DHCP server.
Description: How To Configure DHCP Failover In Windows Server 2012 R2
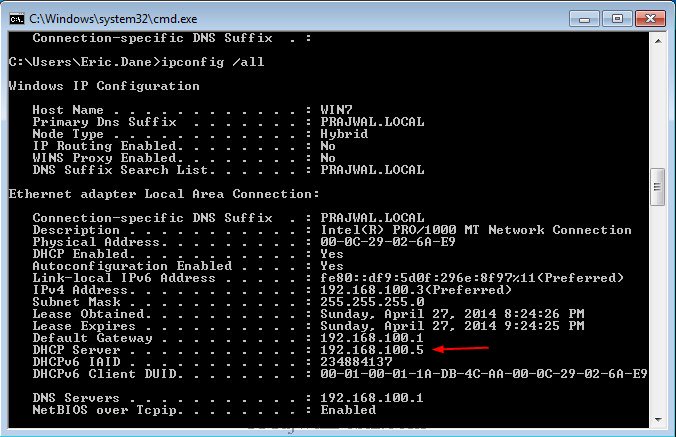
To test the DHCP failover we will log in to one of the client machine. Launch the command prompt and type ipconfig /all, make a note of DHCP server that has provided the IP address. In our case the DHCP server is 192.168.100.1 (AD.PRAJWAL.LOCAL).
Description: How To Configure DHCP Failover In Windows Server 2012 R2
Now on 192.168.100.1 DHCP server we will disable the network device. After waiting for few seconds on the client machine we see that DHCP server IP is changed to 192.168.100.5. This means that when our primary DHCP server 192.168.100.1 was down, the other DHCP server 192.168.100.5 assigned the IP address to the client machine.
Description: How To Configure DHCP Failover In Windows Server 2012 R2