Wednesday, 18 March 2015

மறந்துபோன மொபைல் நம்பரை கண்டுபிடிக்க எளிய வழி..!

Easy way to find out forgotten mobile number
புதியதாக மொபைல் போன் (Mobile) வாங்கியிருப்பீர்கள். கூடவே புதிய SimCard -ம் வாங்கியிருப்பீர்கள். அதனால் உங்களுக்கு புதிய எண் கிடைத்திருக்கும். எடுத்தவுடனேயே அந்த எண் உங்களுக்கு நினைவுக்கு வராது. பல நாட்கள் பயன்படுத்திய பிறகுதான் நினைவுக்கு வரும்.
நண்பர்கள் யாருக்கேனும் அந்த எண்ணை கொடுக்க நினைத்தால் உடனடியாக எண் நினைவில் வராமல் போகும். அதுபோன்ற சமயங்களில் இந்த எளிய முறை உங்களுக்குப் பயன்படும்.

அடிக்கடிப் பயன்படுத்தும் எண் கூட சில சமயங்களில் மறதியால் மறந்துவிடக்கூடிய வாய்ப்பும் இருக்கும்.
நீங்கள் எந்த ஒரு நிறுவனத்தின் அலைப்பேசி சேவையைப் பயன்படுத்தினாலும், உடனடியாக நீங்கள் உங்களுடைய அலைப்பேசி எண்ணைத் தெரிந்துகொள்ள கீழிருக்கும் குறுக்கு வழிகள் உங்களுக்குப் பயன்டும்.
  1. நீங்கள் Tata Decomo Mobile சேவையைப் பயன்படுத்தினால் 580#  என்ற குறியீட்டை உள்ளிட்டு Ok அழுத்தினால் உங்களுடைய மொபைல் எண் அலைபேசித் திரையில் தோன்றும்.
  2.  Aircel சேவையைப் பயன்படுத்துபவர்கள் *131#
  3. Airtel சேவையைப் பயன்படுத்துபவர்கள் *121*9#
  4. Reliance சேவையைப் பயன்படுத்துபவர்கள்  *1#
  5. Vodafone சேவையைப் பயன்படுத்துபவர்கள்  *777*0#
  6. Bsnl சேவையைப் பயன்படுத்துபவர்கள்  *888#
  7. Idea சேவையைப் பயன்படுத்துபவர்கள் *1#
  8. Videocon சேவையைப் பயன்படுத்துபவர்கள் *1#
  9. Virgin Mobile சேவையைப் பயன்படுத்துபவர்கள் *1# 
ஆகிய குறியீடுகளைப் பயன்படுத்தி உடனடியாக தங்களுடைய Mobile Number – ஐ உடனடியாக தெரிந்துகொள்ள முடியும்.

Thursday, 12 March 2015

Resetting Administrator Password in Windows 2008 R2

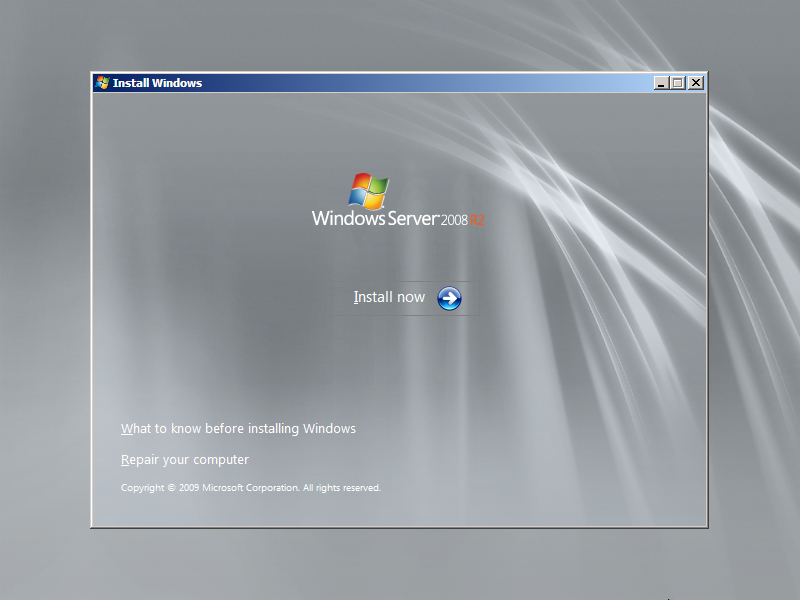
  • Boot from the Micrsoft Windows Server 2008 DVD
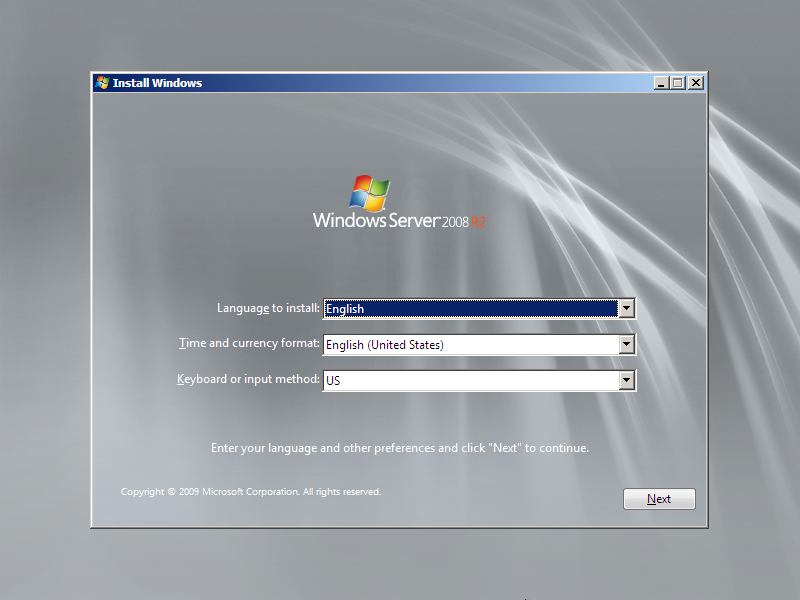
  • From the Install Windows menu, click “Next”.
  • Select “Repair your computer”
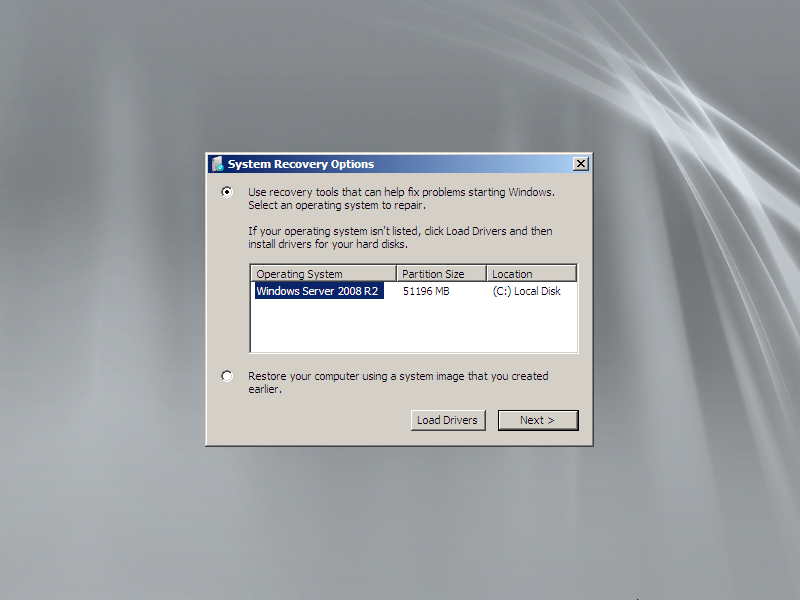
  • In the System Recovery Options, select the Operating System instance that you wish to repair and click “Next”.
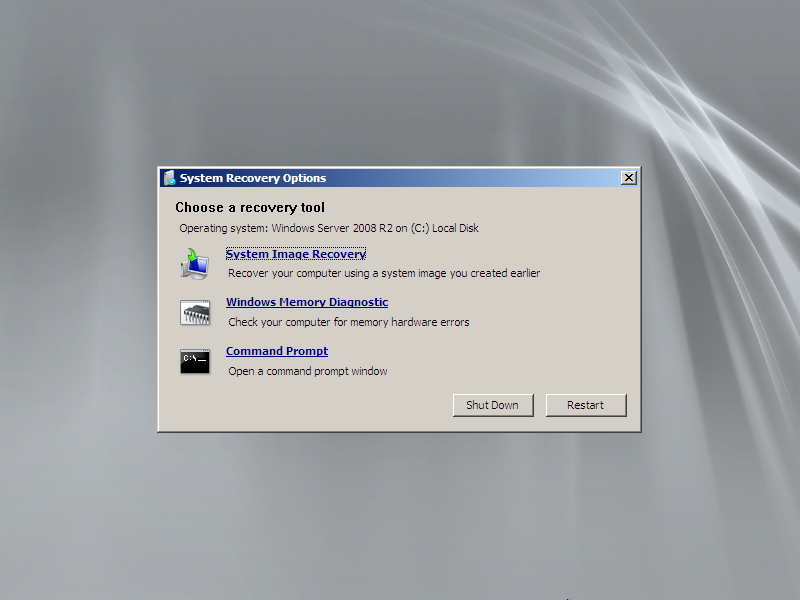
  • Select “Command Prompt”. The
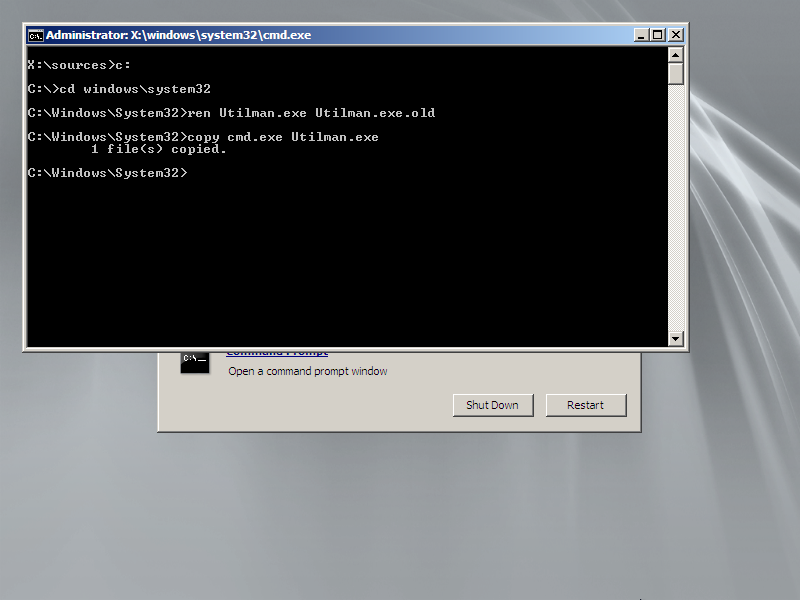
  • At the command prompt, run the following commands:
    c:
    cd windows\system32
    ren Utilman.exe Utilman.exe.old
    copy cmd.exe Utilman.exe
  • Reboot the server allowing Windows to load as normal
  • At the logon screen, press Windows Key + U.
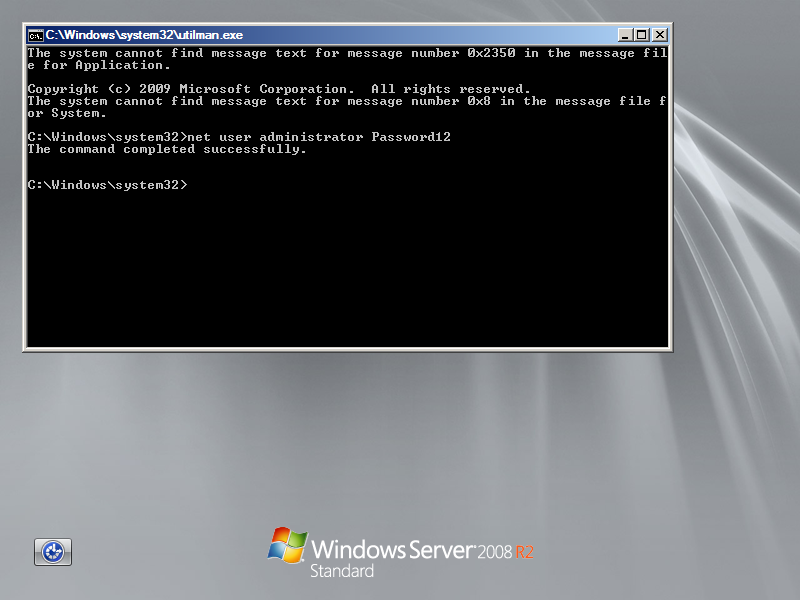
  • As the command prompt, enter the following command:
    net user administrator Password12
    This will set the password for the Administrator user to be Password12 (case sensitive).
Closing the command prompt, you should now be able to log back onto the server using the password you have provided in the last step.

Cleanup Steps

Once you have verified you can log on to the server you will have repeat the steps above and boot using the Windows Server 2008 DVD/ISO and run the command prompt again.
  • Delete the newly created Utilman.exe from C:\Windows\System32
  • Rename Utilman.exe.old back to Utilman.exe
You should be back up and running as if nothing ever happened.

Some Screenshots

w2k8_password_reset_01 w2k8_password_reset_02 w2k8_password_reset_03 w2k8_password_reset_04 w2k8_password_reset_05 w2k8_password_reset_06

Monday, 9 March 2015

VERY USEFUL SHORT FORMS

1.) GOOGLE : Global Organization Of Oriented Group Language Of Earth .
2.) YAHOO : Yet Another Hierarchical Officious Oracle .
3.) WINDOW : Wide Interactive Network Development for Office work Solution.
4.) COMPUTER : Common Oriented Machine Particularly United and used under Technical and Educational Research.
5.) VIRUS : Vital Information Resources Under Siege .
6.) UMTS : Universal Mobile Telecommunications System .
7.) AMOLED : Active-matrix organic light-emitting diode.
8.) OLED : Organic light-emitting diode.
9.) IMEI: International Mobile Equipment Identity .
10.) ESN: Electronic Serial Number .
11.) UPS: uninterruptible power supply .
12. HDMI: High-Definition Multimedia Interface.
13.) VPN: virtual private network.
14.) APN: Access Point Name.
15.) SIM: Subscriber Identity Module.
16.) LED: Light emitting diode.
17.) DLNA: Digital Living Network Alliance
18.) RAM: Random access memory.
19.) ROM: Read only memory.
20.) VGA: Video Graphics Array.
21.) QVGA: Quarter Video Graphics Array.
22.) WVGA: Wide video graphics array.
23.) WXGA: Widescreen Extended Graphics Array.
24.) USB: Universal serial Bus.
25.) WLAN: Wireless Local Area Network.
26.) PPI: Pixels Per Inch.
27.) LCD: Liquid Crystal Display.
28.) HSDPA: High speed down-link packet access.
29.) HSUPA: High-Speed Uplink Packet Access.
30.) HSPA: High Speed Packet Access.
31.) GPRS: General Packet Radio Service.
32.) EDGE: Enhanced Data Rates for Global Evolution.
33.) NFC: Near field communication.
34.) OTG: on-the-go.
35.) S-LCD: Super Liquid Crystal Display.
36.) O.S: Operating system.
37.) SNS: Social network service.
38.) H.S: HOTSPOT.
39.) P.O.I: point of interest.
40.) GPS: Global Positioning System.
41.) DVD: Digital Video Disk.
42.) DTP: Desk top publishing.
43.) DNSE: Digital natural sound engine .
44.) OVI: Ohio Video Intranet.
45.) CDMA: Code Division Multiple Access.
46.) WCDMA: Wide-band Code Division Multiple Access.
47.) GSM: Global System for Mobile Communications.
48.) WI-FI: Wireless Fidelity.
49.) DIVX: Digital internet video access.
50.) APK: authenticated public key.
51.) J2ME: java 2 micro edition.
52.) SIS: installation source.
53.) DELL: Digital electronic link library.
54.) ACER: Acquisition Collaboration Experimentation Reflection.
55.) RSS: Really simple syndication.
56.) TFT: thin film transistor.
57.) AMR: Adaptive Multi-Rate.
58.) MPEG: moving pictures experts group.
59.) IVRS: Interactive Voice Response System.
60.) HP: Hewlett Packard.

டெஸ்க்டாப்பில் ரைட் கிளிக் செய்து பெறும் பயன்கள்

     கம்ப்யூட்டர் பயனர்கள் பலரும் டெஸ்டாப்பில் ரைட் கிளிக் செய்து Refresh மட்டுமே செய்வார்கள்.
ரைட் கிளிக் செய்யும்போது தோன்றும் விண்டோவில் மேலும் பல பயனுள்ள வசதிகளும் உள்ளன.
பெரும்பாலான பயனர்கள் அவ்வசதிகளைப் பயன்படுத்துவதே இல்லை. அந்த வசதிகளைப் பற்றியும், அதனுடைய பயன்களையும் தெரிந்துகொள்வோம்.
Right Click செய்யும்பொழுது நமக்கு முதலில் தெரியும் பயன்பாடு view.
இது டெஸ்டாப்பில் இருக்கும் அப்ளிகேஷன்களின் ஷார்ட் கட்கள் மற்றும் கோப்புகளின் ஐகான்களை பார்வைக்கு தோற்றம் அளிக்கும் விதத்தை மாற்றுவதற்குப் பயன்படுகிறது.
இதில் உள்ள ஆப்சன்கள்
1. Large icons
டெக்ஸ்டாப்பில் தோன்றும் ஐகான்களை பெரியதாக காட்ட இந்த வசதி பயன்படுகிறது. ரைட் கிளிக் செய்து view >> Large icons என்பதை தேர்ந்தெடுத்திடும்பொழுது டெஸ்க்டாப்பில் தோன்றும் ஐகான்கள் பெரியதாக தோற்றமளிக்கும்.large icons
2. Medium icons
டெக்ஸ்டாப்பில் தோன்றும் ஐகான்களை மீடியமாக காட்ட இந்த வசதி பயன்படுகிறது. ரைட் கிளிக் செய்து view >> Medium icons என்பதை தேர்ந்தெடுத்திடும்பொழுது டெஸ்க்டாப்பில் தோன்றும் ஐகான்கள் மீடியமாக தோற்றமளிக்கும்.
medium-icons
3. Small icons
டெக்ஸ்டாப்பில் தோன்றும் ஐகான்களை சிறியதாக காட்ட இந்த வசதி பயன்படுகிறது. ரைட் கிளிக் செய்து view >> Small icons என்பதை தேர்ந்தெடுத்திடும்பொழுது டெஸ்க்டாப்பில் தோன்றும் ஐகான்கள் மீடியமாக தோற்றமளிக்கும்.
small-icons
4. Auto arrange icons
இந்த வசதியானது டெஸ்க்டாப்பில் அங்கொன்றும் இங்கொன்றுமாக உள்ள ஐகான்களை தானாகவே ஒழுங்குபடுத்திக்கொள்ளும்.
5. Align icons to grid
இந்த வசதியை தேர்ந்தெடுக்கும்பொழுது டெஸ்க்டாப்பில் உள்ள ஐகான்களை grid – ல் அலைன் செய்து அழகாக காட்டும்.
icons align to grid
6. Show desktop icons
இந்த வசதியை செயல்படுத்தும்பொழுது டெஸ்க்டாப் ஐகான்கள் தெரியும். டிக் மார்க்கை எடுத்துவிட்டால் டெஸ்க்டாப்பில் ஐகான்கள் மறைந்துவிடும்.
7. Show gadgets
விண்டோஸ் 7 ல் பயனுள்ள calendar, clock, cpu meter, currency, feed headlines, picutre puzzle, slide show, weather, windows media center போன்ற கேட்கெட்கள் உள்ளன. அவற்றை நீங்கள் பயன்படுத்திக்கொண்டிருந்தால், அவற்றை டெஸ்டாப்பில் தோன்றச் செய்வதற்கும், தேவையில்லை யெனில் மறையச் செய்வதற்கும் பயன்படும் வசதி இதுவாகும்.

Saturday, 31 January 2015

How to Share Folders in Ubuntu & Access them from Windows 7

Enable File Sharing & Configure the Workgroup

How to Share Folders in Ubuntu

First, open the Home Folder in Ubuntu, found in the Places menu.
Folder Sharing
Browse to the folder you want to share. Right-click on it to open the contextual menu and click on Sharing Options.
Folder Sharing
The Folder Sharing window will open. Check the box next to ’Share this folder’. Then, in the Share name field, type the share name you want to use. In the Comment field type anything you want or just leave it empty - there’s no need to complete it. If you want to allow others to create and delete files in the folder you are sharing, check the box next to ’Allow others to create and delete files in this folder’. Also, if you want to allow Guest access, check the box next to ’Guest access (for people without a user account)’. When done, click on Create Share to actually share the folder.
Folder Sharing
If you have selected the option ’Allow others to create and delete files in this folder’ a pop-up shows up, asking if you want to add some permissions to the folder you are sharing. Click on the ’Add the permissions automatically’ button. Now, the folder is shared with the rest of the network.
Folder Sharing
Note: We recommend that you only share folders found or created in the Home Folder because those are folders on which your username has ownership. If you try to share a folder outside the Home Folder, you will receive the following error message: “net usershare returned error 255: net usershare add: cannot share path as we are restricted to only sharing directories we own." This error appears because you don’t have ownership on those folders. In order to share any of them you have to go through a complicated procedure that has the potential to add security risks to your Ubuntu computer.
Folder Sharing

Access Ubuntu Shared Folders from Windows 7

After you shared a folder in Ubuntu, let’s see how to access that folder from a Windows 7 computer.
Open Windows Explorer. Click on Network to view a list with all computers available (turned on at that time) in the network.
Folder Sharing
Double click the Ubuntu computer you want to access. A list with all the shared folders and devices from that computer opens.
Folder Sharing
Double click the folder that you want to access. If you haven’t setup the shared folder to allow Guest access, you are asked to introduce a username and password.
In the first input field, type the name of the Ubuntu computer followed by a backslash (“\") and the name of the user account with access to the shared folder. In the second input field type the password. If you want Windows to remember your username and password, check the box next to ’Remember my credentials’. When done, click on OK.
Folder Sharing
Now the content of the shared folder is shown.
Folder Sharing

Connect to a Windows PC from Ubuntu via Remote Desktop Connection

Step 1: Enable Remote Desktop Connections on your Windows PC

In order to allow other computers to connect remotely to your Windows computer, you need to enable the Remote Desktop Connection feature. .

Step 2: Install a Remote Desktop Client - Our Choice: Remmina Remote Desktop Client

By default, Ubuntu doesn’t come with a remote desktop client which supports the Remote Desktop Protocol (RDP) used by Windows operating systems for remote connections. You need to install one of the clients available in the Ubuntu Software Center.
First, start the Ubuntu Software Center.
Remmina, Remote Desktop Client, Ubuntu, Linux
Search for the words "remote desktop" and you will be shown all the available applications.
We preferred to choose Remmina Remote Desktop Client, a client which is very appreciated by the user community and is, at the same time, very versatile and easy to use.
To get it installed, select it and click Install.
Remmina, Remote Desktop Client, Ubuntu, Linux
You are asked for your password. Type it and click Authenticate.
Remmina, Remote Desktop Client, Ubuntu, Linux
NOTE: please keep in mind that, in order to install software, your user account needs to have administrative permissions. If you are set as a standard user account, you cannot install any software.
Now the application is downloaded and installed. Wait until the procedure ends.

Step 3: Configure the Remote Desktop Session

It is time to start the Remmina Remote Desktop Client. Search your Ubuntu PC using the word remmina and click on the appropriate search result.
Remmina, Remote Desktop Client, Ubuntu, Linux
Click the "Create a new remote desktop file" button.
Remmina, Remote Desktop Client, Ubuntu, Linux
The Remote Desktop Preference window is opened. Here you can configure the remote connection you want to establish.
In the Profile section, type the name you want to use for the connection. It can be anything you wish. Then, in the Basic tab, complete the IP address of the Windows computer in the Server field. Then, type the username and password you want to use to connect to the Windows computer. Be aware that the user needs to exist on the Windows computer. If you are using a Microsoft account on your Windows 8 PC, it is OK to fill in your email address and password.
You can also set the Resolution you want to use for the connection and the Color depth.
Remmina, Remote Desktop Client, Ubuntu, Linux
NOTE: Selecting a larger desktop resolution and color depth can impact the performance of your remote desktop session. If you experience lag when connected to a remote desktop, try reducing the color depth or resolution.
If you want to share a folder existing on your Ubuntu computer with the Windows computer, simply check the Share folder box and select the folder you want to share from Ubuntu.
Also, for more advanced settings, go to the Advanced tab. There you can turn the sound on or off, share printers, disable clipboard synchronisation, etc.
Remmina, Remote Desktop Client, Ubuntu, Linux
Once you are done making all the settings, click the Connect button. When connecting for the first time, a new certificate is created for the remote connection. Click OK to accept it.
Remmina, Remote Desktop Client, Ubuntu, Linux
After a while, if the Windows computer is turned on and connected to the same network, you should be connected to it.
Remmina, Remote Desktop Client, Ubuntu, Linux
Once you close the remote connection, Remmina Remote Desktop Client automatically saves it so that you will be able to reconnect at a later time, with a simple click on the connection name.
Remmina, Remote Desktop Client, Ubuntu, Linux